
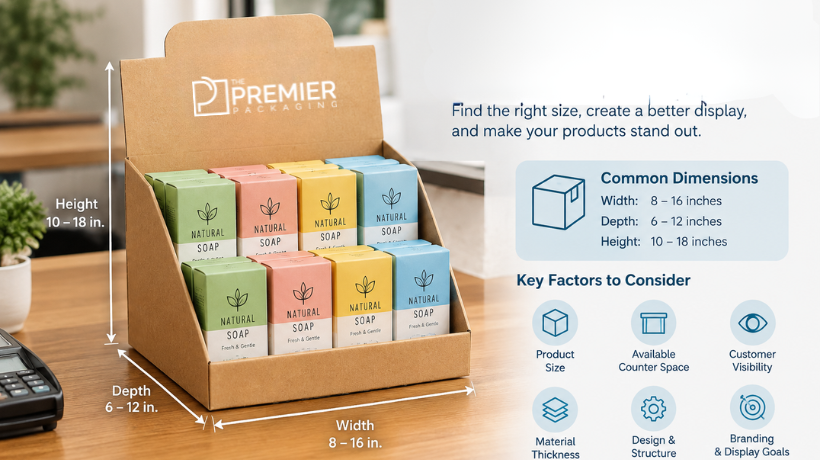

Getting the measurements right is one of the most important steps when designing a box. Even a quarter-inch difference can affect how the lid fits, how the product sits inside, and how the finished package looks on a retail shelf.
This is especially true with a bottom display lid, where the lid and base need to work together rather than being measured as two unrelated pieces. If the measurements are too tight, the lid may be difficult to close or remove. If they are too loose, the package can look poorly fitted and may not protect the product properly.
The good news is that measuring one doesn’t have to be complicated. You mainly need to understand which side represents the length, which represents the width, how much depth is required, and whether you’re working with inside or outside measurements.
Understand the Three Main Measurements
Most box dimensions are written in this order:
Length × Width × Depth
For example, a box measuring 8 × 5 × 2 inches is:
- 8 inches long
- 5 inches wide
- 2 inches deep
Length is generally the longest side of the box. Width runs across the shorter side, while depth represents the distance from the bottom to the top.
Before taking measurements, decide whether you need the inside dimensions or the outside dimensions. This small detail makes a big difference.
If the product needs to fit inside the box, interior dimensions are usually the most useful starting point. If you’re checking whether the finished package will fit on a shelf, counter, or shipping carton, exterior dimensions may matter more.
Measure the Product Before Measuring the Box
Don’t start by guessing the box size.
Place the product on a flat surface and measure its longest side first. Write down the measurement before moving to the width and height. If the product has an unusual shape, measure its widest and tallest points rather than relying on a single narrow section.
For example, suppose your product measures:
| Product Measurement | Size in Inches |
| Length | 6 inches |
| Width | 4 inches |
| Height | 1.5 inches |
You shouldn’t automatically order a box measuring exactly 6 × 4 × 1.5 inches. The product needs some clearance to be placed inside and removed without damaging either the product or the packaging.
A small amount of additional space should be considered according to the product type and how snugly it needs to fit.
Leave Enough Clearance
Clearance is the extra space between the product and the package’s interior walls.
For many products, allowing approximately 0.125 to 0.25 inches of additional room on relevant sides can be a useful starting point. Fragile, irregularly shaped, or protective-packaged products may require more.
Here’s a simple example:
| Measurement | Product Size | Possible Interior Size |
| Length | 6 inches | 6.25 inches |
| Width | 4 inches | 4.25 inches |
| Height | 1.5 inches | 1.75 inches |
These figures are illustrative rather than universal. The appropriate clearance depends on the product, material thickness, inserts, and desired fit.
Too little clearance can make assembly frustrating. Too much can allow the product to move around unnecessarily.
Don’t Forget the Material Thickness
One of the easiest mistakes is measuring the product correctly but ignoring the packaging material’s thickness.
If you’re working with paperboard, folding carton stock, corrugated material, or a thicker rigid board, the finished outside measurement won’t necessarily match the interior measurement.
For example, if the interior dimensions are 8 × 5 × 2 inches, the finished exterior will be slightly larger once the material thickness is taken into account.
That’s why a packaging supplier or structural designer may ask whether your dimensions are inside, outside, or finished dimensions.
Always make this clear before production.
Measure the Lid Separately
A bottom display lid consists of two related parts: the base and the lid. Their measurements need to complement each other.
The lid should have enough room to slide over, fold around, or sit against the base, depending on the particular construction.
A useful measurement checklist looks like this:
| Area to Measure | What to Check |
| Base length | Longest internal or external side |
| Base width | Shorter horizontal side |
| Base depth | Product height and clearance |
| Lid length | Must correspond with the base structure |
| Lid width | Check against base width |
| Lid depth | Account for the intended fit |
| Material thickness | Include board or paper thickness |
| Product clearance | Allow practical room around the product |
Don’t assume that simply copying the base dimensions onto the lid will produce the correct result. The construction style determines how the lid needs to be sized.
A Simple Example: 1-2-3 Bottom Display Lid Box
Let’s say you’re developing a 1-2-3 Bottom Display Lid Box for a product that measures 7 × 4 × 2 inches.
You might begin by establishing an interior space slightly larger than the product:
7.25 × 4.25 × 2.25 inches
From there, the structural design can account for folds, panels, material thickness, and the way the lid connects to the bottom section.
The numbers aren’t a universal specification. They’re an example of how to approach the calculation.
The important point is to work from the actual product measurements and then build the packaging around them.
Use a Ruler or Measuring Tape Correctly
A basic ruler can be enough for many box measurements, but accuracy matters.
Place the ruler directly against the edge rather than estimating the distance visually. Keep it straight and measure from one exact point to another.
For small products, a digital caliper can provide more precise measurements, especially when you need to determine thickness or measure curved edges.
If you’re measuring several identical products, check more than one item. Manufacturing tolerances can sometimes create small differences between individual pieces.
Think About How the Product Will Be Displayed
The box may be designed for more than protection. If the bottom section is intended to function as a display once the lid is removed, the dimensions should support that purpose.
Consider where the product will sit and how customers will see it.
Will several products stand side by side? Will they be arranged in rows? Does the display need dividers? Will the front edge need to remain low enough for customers to see the product?
For example, a display containing six products might need an interior arrangement like:
| Product Arrangement | Approx. Interior Planning |
| 2 products across | Wider compartments |
| 3 products across | Moderate width per item |
| 6 products in one row | Longer overall length |
| 3 × 2 arrangement | Balanced length and width |
| Tiered arrangement | Additional height planning |
The dimensions should reflect the final presentation, not just the size of a single product.
Check the Lid Fit Before Final Production
If you’re producing a prototype, don’t skip the physical fit test.
Place the actual product inside the base and test the lid several times. Open and close it as a customer would. Check whether the lid catches on the product, whether the corners line up, and whether the package feels too loose.
This simple test can reveal problems that aren’t obvious from measurements alone.
For businesses developing custom packaging, The Premier Packaging can use the product dimensions and structural requirements as a starting point for determining an appropriate box configuration.
Keep a Dimension Sheet
Writing measurements down in a consistent format can prevent expensive mistakes.
A simple dimension sheet might look like this:
| Specification | Measurement |
| Product length | 7 inches |
| Product width | 4 inches |
| Product height | 2 inches |
| Required length | 7.25 inches |
| Required width | 4.25 inches |
| Required depth | 2.25 inches |
| Measurement type | Interior |
| Units | Inches |
Clearly label every measurement. Don’t write “7.25” without saying whether it refers to length, width, height, inside, or outside.
Common Measurement Mistakes to Avoid
A few mistakes appear repeatedly during packaging development.
Measuring only the product: The product is important, but clearance and packaging construction also affect the final size.
Confusing inside and outside dimensions: Always identify which measurement you’re providing.
Ignoring material thickness: Board thickness changes the finished dimensions.
Forgetting inserts: Foam, cardboard dividers, trays, and other inserts take up valuable interior space.
Rounding too aggressively: If your product is 7.18 inches, don’t automatically round it down to 7 inches. That could create a poor fit.
Skipping a prototype: A physical sample can expose structural problems before a full production run.
Final Thoughts
Accurate measurement is the foundation of a well-fitting bottom display lid. Start with the product, record its length, width, and height in inches, then determine how much clearance is appropriate. After that, account for material thickness, inserts, folding panels, and the actual construction of the lid and base.
A practical measurement process should look like this:
Measure the product → decide the required clearance → establish interior dimensions → account for material thickness → design the lid and base → test a physical sample.
There is no single dimension that works for every product. A small retail item might need a compact 4 × 3 × 2-inch package, while a larger product could require a package measuring 12 × 8 × 4 inches or more. What matters is that the final dimensions match the product and the intended display arrangement.
Taking a few extra minutes to measure carefully at the beginning can save considerable time, material, and production costs later.